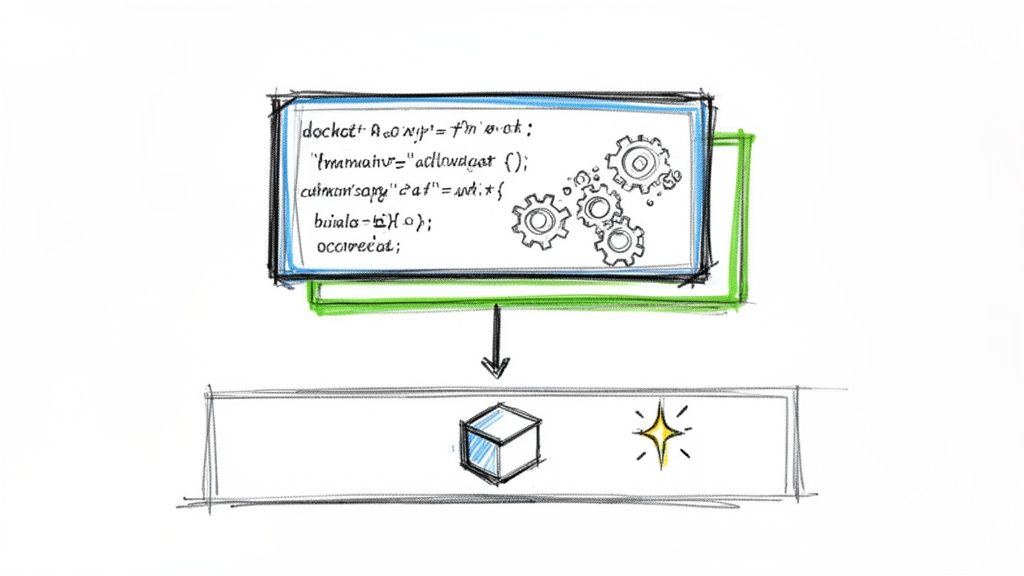
A docker multi-stage build is a powerful technique for creating lean, secure, and efficient container images. It works by logically separating the build environment from the final runtime environment within a single Dockerfile. This allows you to use a comprehensive image with all necessary compilers, SDKs, and dependencies to build your application, then selectively copy only the essential compiled artifacts into a minimal, production-ready base image.
The result is a dramatic reduction in image size, leading to faster CI/CD pipelines, lower storage costs, and a significantly smaller security attack surface.
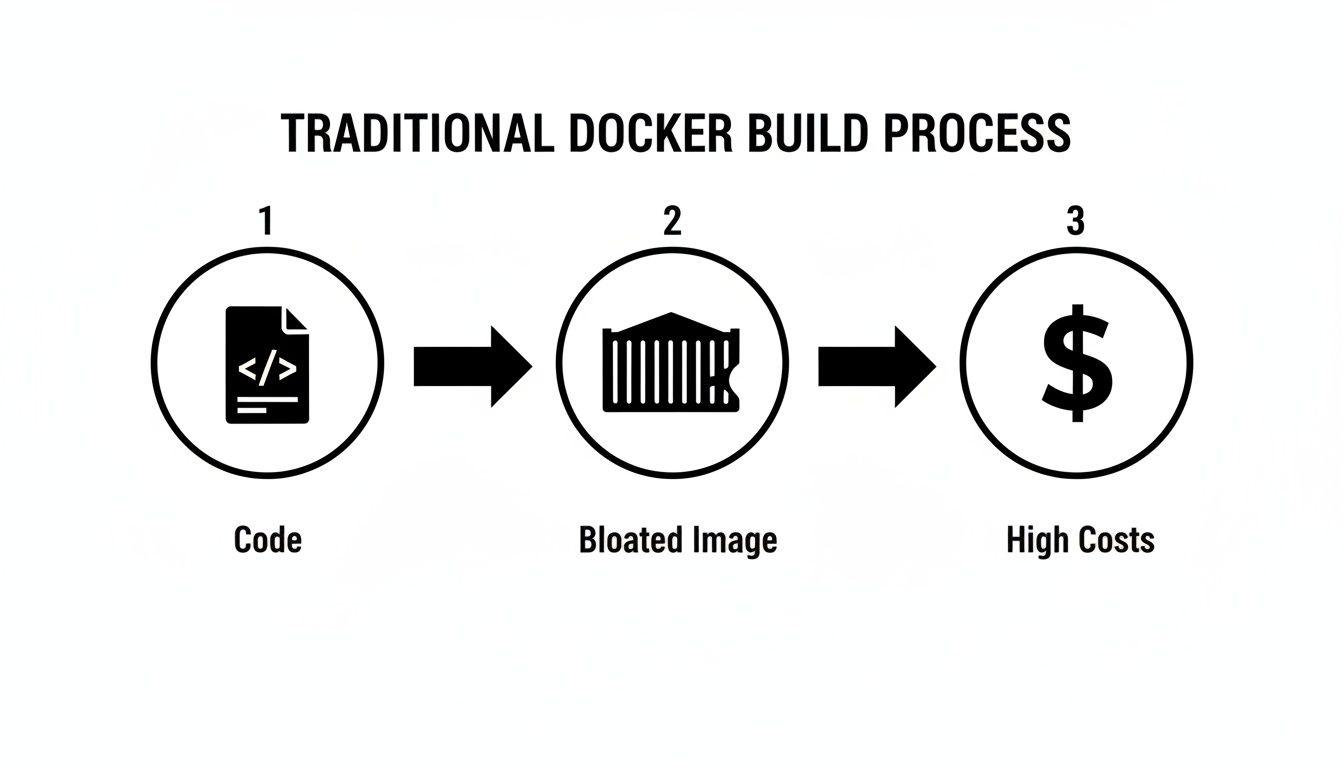
The Technical Debt of Single-Stage Docker Builds
In a traditional single-stage Dockerfile, the build process is linear. The final image is the result of the last command executed, inheriting every layer created along the way. This includes build tools, development dependencies, intermediate files, and source code—none of which are required to run the application in production.
This approach, while simple, introduces significant technical debt. Every unnecessary binary and library bundled into your production image is a potential liability.
Consider a standard Node.js application. A naive Dockerfile might start from a full node:20 image, which is several hundred megabytes. The subsequent npm install command then pulls in not only production dependencies but also development-time packages like nodemon, jest, or webpack. The final image can easily exceed 1GB, containing the entire Node.js runtime, npm, and a vast node_modules tree.
The Business Impact of Bloated Images
This technical inefficiency has direct business consequences. Oversized images introduce operational friction that compounds as you scale, creating tangible costs and risks.
Here’s a breakdown of the impact:
- Inflated Cloud Storage Costs: Container registries like Docker Hub, Amazon ECR, or Google Artifact Registry charge for storage. Multiplying large image sizes by the number of services and versions results in escalating monthly bills.
- Slow and Inefficient CI/CD Pipelines: Pushing and pulling gigabyte-sized images over the network introduces significant latency into build, test, and deployment cycles. This directly impacts developer productivity and slows down the time-to-market for new features and critical fixes.
- Expanded Security Attack Surface: Every extraneous package, library, and binary is a potential vector for vulnerabilities (CVEs). A bloated image containing compilers, package managers, and shells provides attackers with a rich toolkit to exploit if they gain initial access.
By bundling build-time dependencies, you're essentially shipping your entire workshop along with the finished product. This creates a slow, expensive, and insecure supply chain. A docker multi-stage build elegantly solves this by ensuring only the final product is shipped.
Single Stage vs Multi Stage A Technical Snapshot
A side-by-side comparison highlights the stark differences between the two methodologies. The traditional approach produces a bloated artifact, whereas a multi-stage build creates a lean, optimized, and production-ready image.
| Metric | Single Stage Build (The Problem) | Multi Stage Build (The Solution) |
|---|---|---|
| Final Image Size | Large (500MB – 1GB+), includes build tools & dev dependencies. | Small (<100MB), contains only the application and its runtime. |
| Build Artifacts | Build tools, source code, and intermediate layers are all included. | Only the compiled application binary or necessary files are copied. |
| CI/CD Pipeline Speed | Slower due to pushing/pulling large images. | Faster, as smaller images transfer much more quickly. |
| Security Surface | High. Includes many unnecessary packages and libraries. | Minimal. Only essential runtime components are present. |
| Resource Usage | Higher storage costs and network bandwidth consumption. | Lower costs and more efficient use of network resources. |
Adopting multi-stage builds is a fundamental shift toward creating efficient, secure, and cost-effective containerized applications. This technique is a key driver of modern DevOps practices, contributing to Docker's 92% adoption rate among IT professionals. By enabling the creation of images that are up to 90% smaller, multi-stage builds directly improve pipeline efficiency and reduce operational overhead. You can explore more about Docker's growing adoption among professionals to understand its market significance. This is no longer just a best practice; it's a core competency for modern software engineering.
Deconstructing the Multi Stage Dockerfile
The core principle of a docker multi-stage build is the use of multiple FROM instructions within a single Dockerfile. Each FROM instruction initiates a new, independent build stage, complete with its own base image and context. This logical separation is the key to isolating build-time dependencies from the final runtime image.
You can begin with a feature-rich base image like golang:1.22 or node:20, which contain the necessary SDKs and tools to compile code or bundle assets. Once the build process within that stage is complete, the entire stage—including its filesystem and all intermediate layers—is discarded. The only artifacts that persist are those you explicitly copy into a subsequent stage.
The old way of doing things often meant all that build-time baggage came along for the ride into production.
As you can see, that single-stage workflow directly ties your development clutter to your production artifact, which is inefficient and costly. Multi-stage builds completely sever that link.
Naming Stages with the AS Keyword
To manage and reference these distinct build environments, the AS keyword is used to assign a name to a stage. This makes the Dockerfile more readable and allows the COPY --from instruction to target a specific stage as its source. Well-named stages are crucial for creating maintainable and self-documenting build scripts.
Consider this example for a Go application:
FROM golang:1.22-alpine AS builderinitiates a stage named builder. This is our temporary build environment.FROM alpine:latest AS finalstarts a second stage named final, which will become our lean production image.
By naming the first stage builder, we create a stable reference point, enabling us to precisely extract build artifacts later in the process.
Think of a well-named stage as a label on a moving box. The
builderbox is full of your tools, scrap wood, and sawdust. Thefinalbox has only the polished, finished piece of furniture. Your goal is to ship just thefinalbox.
Cherry Picking Artifacts with COPY from
The COPY --from instruction is the mechanism that connects stages. It enables you to copy files and directories from a previous stage's filesystem into your current stage. This selective transfer is the cornerstone of the multi-stage build pattern.
Continuing with our Go example, after compiling the application in the builder stage, we switch to the final stage and execute the following command:
COPY --from=builder /go/bin/myapp /usr/local/bin/myapp
This command instructs the Docker daemon to:
- Reference the filesystem of the completed stage named
builder. - Locate the compiled binary at the source path
/go/bin/myapp. - Copy only that file to the destination path
/usr/local/bin/within the current (final) stage's filesystem.
The builder stage, along with the entire Go SDK, source code, and intermediate build files, is then discarded. It never contributes to the layers of the final image, resulting in a dramatic reduction in size. This fundamental separation is what a docker multi stage build is all about. For a refresher on Docker fundamentals, our Docker container tutorial for beginners offers an excellent introduction.
This technique is language-agnostic. It can be used to copy minified JavaScript assets from a Node.js build stage into a lightweight Nginx image, or to move a compiled Python virtual environment into a slim runtime container. The pattern remains consistent: perform heavy build operations in an early stage, copy only the necessary artifacts to a minimal final stage, and discard the build environment.
Practical Multi Stage Builds for Your Tech Stack
Let's translate theory into practice with actionable, real-world examples. These Dockerfile implementations demonstrate how to apply the docker multi stage build pattern across different technology stacks to achieve significant optimizations.
Each example includes the complete Dockerfile, an explanation of the strategy, and a quantitative comparison of the resulting image size reduction.
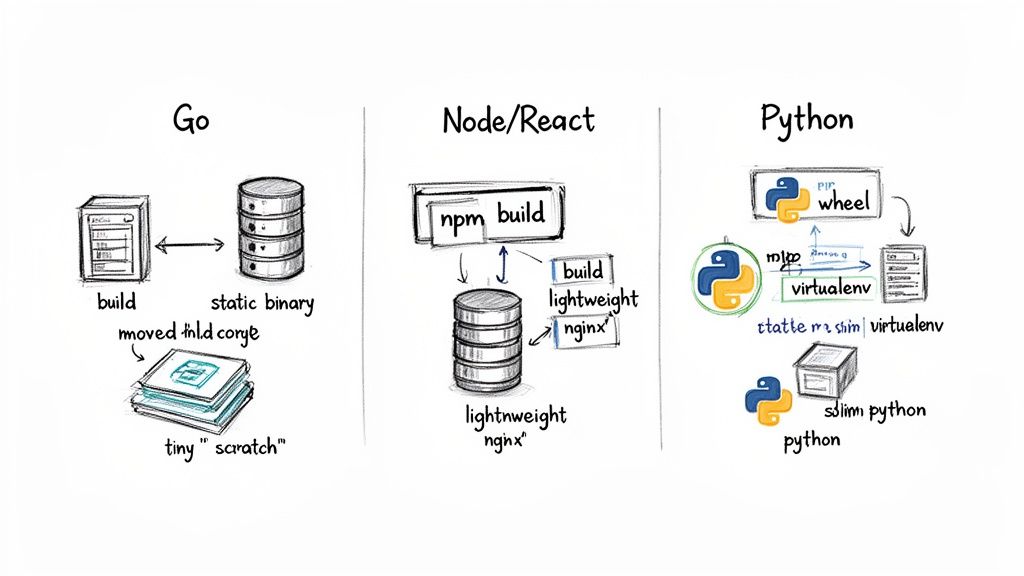
Go App Into an Empty Scratch Image
Go is ideal for multi-stage builds because it compiles to a single, statically linked binary with no external runtime dependencies. This allows us to use scratch as the final base image—a special, zero-byte image that provides an empty filesystem, resulting in the smallest possible container.
The Strategy:
- Builder Stage: Utilize a full
golangimage containing the compiler and build tools to produce a static binary.CGO_ENABLED=0is critical for ensuring no dynamic linking to system C libraries. - Final Stage: Start from
scratchto create a completely empty image. - Artifact Copy: Copy only the compiled binary from the
builderstage into thescratchstage. Optionally, copy necessary files like SSL certificates if the application requires them.
Here's the optimized Dockerfile:
# Stage 1: The 'builder' stage for compiling the Go application
FROM golang:1.22-alpine AS builder

# Set the working directory inside the container
WORKDIR /app

# Copy the go.mod and go.sum files to leverage Docker's layer caching
COPY go.mod go.sum ./
RUN go mod download

# Copy the rest of the application source code
COPY . .

# Build the Go application, disabling CGO for a static binary and stripping debug symbols
# The -ldflags "-s -w" flags are crucial for reducing the binary size.
RUN CGO_ENABLED=0 GOOS=linux go build -ldflags="-s -w" -o /go-app .

# Stage 2: The final, ultra-lightweight production stage
FROM scratch

# Copy the compiled binary from the 'builder' stage
COPY --from=builder /go-app /go-app

# Set the command to run the application
ENTRYPOINT ["/go-app"]
The Payoff: A typical Go application image built this way can shrink from over 350MB (using the full
golangimage) down to less than 10MB. That's a size reduction of over 97%.
Node.js and React App Served by Nginx
For frontend applications built with frameworks like React or Vue, the build process generates a directory of static assets (HTML, CSS, JavaScript). The production environment does not require the Node.js runtime, node_modules, or any build scripts. A lightweight web server like Nginx is sufficient to serve these files.
The Strategy:
- Builder Stage: Use a
nodebase image to executenpm installand the build script (e.g.,npm run build), which outputs abuildordistdirectory. - Final Stage: Use a slim
nginximage as the final base. - Artifact Copy: Copy the contents of the static asset directory from the
builderstage into Nginx's default webroot (/usr/share/nginx/html).
This Dockerfile demonstrates the clear separation of concerns:
# Stage 1: Build the React application
FROM node:20-alpine AS builder

WORKDIR /app

# Copy package.json and package-lock.json first for cache optimization
COPY package*.json ./

# Install dependencies using npm ci for deterministic builds
RUN npm ci

# Copy the rest of the application source code
COPY . .

# Build the application for production
RUN npm run build

# Stage 2: Serve the static files with Nginx
FROM nginx:1.27-alpine

# Copy the built assets from the 'builder' stage to the Nginx web root
COPY --from=builder /app/build /usr/share/nginx/html

# Expose port 80 to allow traffic to the web server
EXPOSE 80

# The default Nginx entrypoint will start the server
CMD ["nginx", "-g", "daemon off;"]
This approach discards hundreds of megabytes of Node.js dependencies that are unnecessary for serving static content. This efficiency is a key reason why multi-stage Docker builds have helped drive a 40% growth in Docker Hub pulls. By enabling teams to create images that are 5-10x smaller, the technique provides a significant competitive advantage. For more data, see the research on the growth of the container market on mordorintelligence.com.
Python API With a Slim Runtime
Python applications often have dependencies that require system-level build tools (like gcc and build-essential) for compiling C extensions. These tools are heavy and have no purpose in the runtime environment.
The Strategy:
- Builder Stage: Start with a full Python image. Install build dependencies and create a virtual environment (
venv) to isolate Python packages. - Final Stage: Switch to a
python-slimbase image, which excludes the heavy build tools. - Artifact Copy: Copy the entire pre-built virtual environment from the
builderstage into the final slim image. This preserves the compiled packages without carrying over the compilers.
This Dockerfile isolates the build-time dependencies effectively:
# Stage 1: The 'builder' stage with build tools
FROM python:3.12 AS builder

WORKDIR /app

# Create and activate a virtual environment
ENV VENV_PATH=/opt/venv
RUN python -m venv $VENV_PATH
ENV PATH="$VENV_PATH/bin:$PATH"

# Install build dependencies that might be needed for some Python packages
RUN apt-get update && apt-get install -y --no-install-recommends build-essential

# Copy requirements and install packages into the venv
COPY requirements.txt .
RUN pip install --no-cache-dir -r requirements.txt

# Stage 2: The final, slim production image
FROM python:3.12-slim

WORKDIR /app

# Copy the virtual environment from the 'builder' stage
COPY --from=builder /opt/venv /opt/venv

# Copy the application code
COPY . .

# Activate the virtual environment and set the command
ENV PATH="/opt/venv/bin:$PATH"
CMD ["uvicorn", "main:app", "--host", "0.0.0.0", "--port", "80"]
This method ensures bulky packages like build-essential are never included in the final image, often achieving a size reduction of around 50% or more.
Image Size Reduction Across Different Stacks
The quantitative impact of multi-stage builds is significant. The following table provides typical size reductions based on real-world scenarios.
| Application Stack | Single-Stage Image Size (Approx.) | Multi-Stage Image Size (Approx.) | Size Reduction |
|---|---|---|---|
| Go (Static Binary) | 350 MB | 10 MB | ~97% |
| Node.js/React | 1.2 GB | 25 MB | ~98% |
| Python API | 950 MB | 150 MB | ~84% |
These results underscore that a docker multi stage build is a fundamental technique for any developer focused on building efficient, secure, and production-grade containers, regardless of the technology stack.
Advanced Patterns for Production Grade Builds
Mastering the basics of docker multi stage build is the first step. To create truly production-grade containers, it's essential to leverage advanced patterns that optimize for build speed, security, and maintainability. These techniques are what distinguish a functional Dockerfile from a highly efficient and hardened one.
Let's explore strategies that go beyond simple artifact copying to minimize CI/CD execution times and reduce the container's attack surface.
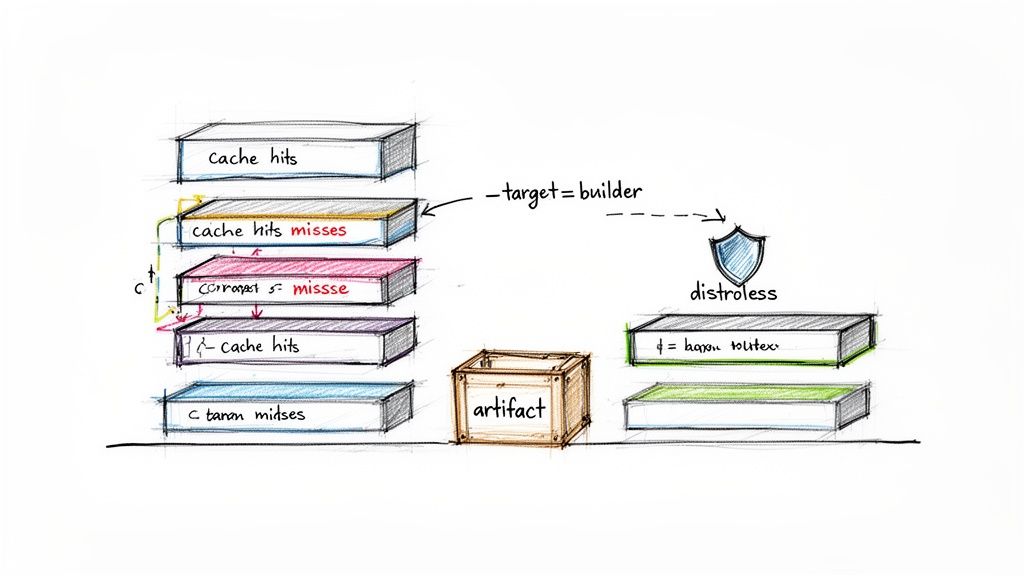
Supercharge Builds by Mastering Layer Caching
Docker's layer caching mechanism is a powerful feature for accelerating builds. Each RUN, COPY, and ADD instruction creates a new image layer. Docker reuses a cached layer from a previous build only if the instruction that created it—and all preceding instructions—remain unchanged.
This makes the order of instructions critical. Structure your Dockerfile to place the least frequently changed layers first.
For a typical Node.js application, the optimal sequence is:
- Copy package manifest files (
package.json,package-lock.json). These change infrequently. - Install dependencies (
npm ci). This command generates a large layer that can be cached as long as the manifests are unchanged. - Copy the application source code. This changes with nearly every commit.
This structure ensures that the time-consuming dependency installation step is skipped on subsequent builds unless the dependencies themselves have changed, reducing build times from minutes to seconds.
Think of your Dockerfile like a pyramid. The stable, unchanging base (dependencies) gets built first. The volatile, frequently updated peak (your code) is added last. This ensures the vast majority of your image is cached and reused.
Target and Debug Intermediate Stages
When a multi-stage build fails, debugging can be challenging. The --target flag provides a solution by allowing you to build up to a specific, named stage without executing the entire Dockerfile.
Consider this Dockerfile with named stages:
# Stage 1: Install dependencies
FROM node:20-alpine AS deps
WORKDIR /app
COPY package*.json ./
RUN npm ci

# Stage 2: Build the application
FROM node:20-alpine AS builder
WORKDIR /app
COPY --from=deps /app/node_modules ./node_modules
COPY . .
RUN npm run build
To validate only the dependency installation, you can run:
docker build --target deps -t my-app:deps .
This command executes only the deps stage and tags the resulting image as my-app:deps. You can then instantiate a container from this image (docker run -it my-app:deps sh) to inspect the filesystem (e.g., the node_modules directory), providing an effective way to debug intermediate steps.
Harden Security with Distroless Images
For maximum security, even a minimal base image like alpine may contain unnecessary components. Alpine includes a shell (sh) and a package manager (apk), which are potential attack vectors. "Distroless" images provide a more secure alternative.
Maintained by Google, distroless images contain only the application and its essential runtime dependencies. They include no shell, no package manager, and no other OS utilities.
Popular distroless images include:
gcr.io/distroless/static-debian12: For self-contained, static binaries (e.g., from Go).gcr.io/distroless/nodejs20-debian12: A minimal Node.js runtime.gcr.io/distroless/python3-debian12: A stripped-down Python environment.
To use a distroless image, simply specify it in your final stage's FROM instruction:
FROM gcr.io/distroless/static-debian12 AS final
The trade-off is that debugging via docker exec is not possible due to the absence of a shell. However, for production environments, the significantly reduced attack surface is a major security benefit. This aligns with advanced Docker security best practices.
Use Dedicated Artifact Stages for Complex Builds
Complex applications may require multiple, unrelated toolchains. For example, a project might need Node.js to build frontend assets and a full JDK to compile a Java backend. A docker multi stage build can accommodate this by using dedicated stages for each build process.
You can define a frontend-builder stage and a separate backend-builder stage. The final stage then aggregates the artifacts from each:
COPY --from=frontend-builder /app/dist /staticCOPY --from=backend-builder /app/target/app.jar /app.jar
This pattern promotes modularity, keeping each build environment clean and specialized. It enhances the readability and maintainability of the Dockerfile as the application's complexity grows. Once your images are optimized, the next consideration is orchestration, where understanding Docker vs Kubernetes for container management becomes critical.
Integrating Multi-Stage Builds into Your CI/CD Pipeline
The true value of an optimized docker multi stage build is realized when it is integrated into an automated CI/CD pipeline. Automation ensures that every commit is built, tested, and deployed efficiently, transforming smaller image sizes and faster build times into increased development velocity.
The objective is to automate the docker build, tag, and push commands, ensuring that lean, production-ready images are consistently published to a container registry like Docker Hub or Amazon ECR. Here are practical implementations for GitHub Actions and GitLab CI.
Automating Builds with GitHub Actions
GitHub Actions uses YAML-based workflow files stored in the .github/workflows directory of your repository. The following workflow triggers on every push to the main branch, builds the image using your multi-stage Dockerfile, and pushes it to a registry.
This production-ready workflow uses the docker/build-push-action and demonstrates best practices like dynamic tagging with the Git commit SHA for traceability.
# .github/workflows/docker-publish.yml
name: Docker Image CI

on:
  push:
    branches: [ "main" ]

jobs:
  build_and_push:
    runs-on: ubuntu-latest
    steps:
      - name: Checkout Repository
        uses: actions/checkout@v4

      - name: Log in to Docker Hub
        uses: docker/login-action@v3
        with:
          username: ${{ secrets.DOCKERHUB_USERNAME }}
          password: ${{ secrets.DOCKERHUB_TOKEN }}

      - name: Set up Docker Buildx
        uses: docker/setup-buildx-action@v3

      - name: Build and push Docker image
        uses: docker/build-push-action@v5
        with:
          context: .
          file: ./Dockerfile
          push: true
          tags: yourusername/your-app:latest,yourusername/your-app:${{ github.sha }}
          cache-from: type=gha
          cache-to: type=gha,mode=max
Key Takeaway: This workflow automates the entire process. The
docker/login-actionhandles secure authentication via repository secrets, and thedocker/build-push-actionmanages the build and push operations efficiently. Thecache-fromandcache-tooptions leverage the GitHub Actions cache to further accelerate builds. For more on creating scalable CI workflows, see these tips on Creating Reusable GitHub Actions.
Configuring a GitLab CI Pipeline
GitLab CI uses a .gitlab-ci.yml file at the root of the repository. It features a tightly integrated Container Registry, which simplifies authentication and image management using predefined CI/CD variables.
This configuration uses a Docker-in-Docker (dind) service to build the image. Authentication is handled seamlessly using environment variables like $CI_REGISTRY_USER and $CI_REGISTRY_PASSWORD, which GitLab provides automatically.
# .gitlab-ci.yml
stages:
  - build

build_image:
  stage: build
  image: docker:24.0.5
  services:
    - docker:24.0.5-dind

  before_script:
    - docker login -u $CI_REGISTRY_USER -p $CI_REGISTRY_PASSWORD $CI_REGISTRY

  script:
    - IMAGE_TAG_LATEST="$CI_REGISTRY_IMAGE:latest"
    - IMAGE_TAG_COMMIT="$CI_REGISTRY_IMAGE:$CI_COMMIT_SHORT_SHA"
    - docker build --cache-from $IMAGE_TAG_LATEST -t $IMAGE_TAG_LATEST -t $IMAGE_TAG_COMMIT .
    - docker push $IMAGE_TAG_LATEST
    - docker push $IMAGE_TAG_COMMIT

  only:
    - main
Key Takeaway: The
--cache-fromflag tells Docker to use the:latestimage from the registry as a cache source, significantly speeding up subsequent builds.
Integrating your docker multi stage build into a pipeline creates a powerful feedback loop. Smaller image sizes lead to lower artifact storage costs and faster deployments. This level of automation is a cornerstone of modern software delivery and aligns with key CI/CD pipeline best practices.
Answering Common Multi-Stage Build Questions
Even with a solid understanding of the fundamentals, several nuances can challenge developers new to multi-stage builds. Here are answers to common questions that arise during implementation.
Can I Use an ARG Across Different Build Stages?
Yes, but the scope of the ARG depends on its placement.
An ARG declared before the first FROM instruction has a global scope and is available to all subsequent stages. However, if an ARG is declared after a FROM instruction, its scope is limited to that specific stage. To use the argument in a later stage, you must redeclare it after that stage's FROM line. Forgetting to redeclare is a common source of build errors where variables appear to be unset.
What Is the Difference Between Alpine and Distroless Images?
Both Alpine and distroless images are designed for creating minimal containers, but they differ in their philosophy on security and debuggability.
- Alpine Linux: A minimal Linux distribution that includes a package manager (
apk) and a shell (/bin/sh). This makes it extremely useful for debugging, as you can usedocker execto gain interactive access to a running container. - Distroless Images: Maintained by Google, these images contain only the application and its direct runtime dependencies. They have no shell, package manager, or other standard utilities.
The choice involves a trade-off. Alpine is small and easy to debug interactively. Distroless is even smaller and provides a significantly reduced attack surface, making it the more secure option for production environments. However, debugging a distroless container requires reliance on application logs and other external observability tools, as interactive access is not possible.
How Can I Optimize Caching in a Multi Stage Build?
Effective layer caching is critical for fast builds in any stage. The key principle is to order your Dockerfile instructions from least to most frequently changed.
Consider a Python application:
COPY requirements.txt ./(Dependency list, changes infrequently)RUN pip install -r requirements.txt(Installs dependencies, a large layer that can be cached)COPY . .(Application source code, changes frequently)
By copying and installing dependencies before copying the application code, you ensure that the time-consuming pip install step is cached and reused across builds, as long as requirements.txt remains unchanged. This simple reordering can reduce build times from minutes to seconds, dramatically improving the developer feedback loop.
Ready to implement advanced DevOps strategies like multi-stage builds but need expert guidance? At OpsMoon, we connect you with the top 0.7% of remote DevOps engineers to accelerate your software delivery. Start with a free work planning session to map out your roadmap and find the perfect talent for your team.
Leave a Reply