
Before you touch a single config file, you need a technical blueprint. A load balancer isn't a "set and forget" device; it's the control plane for your application's reliability and scalability. Initiating configuration without a clear architectural strategy is a direct path to introducing new bottlenecks, single points of failure, or resource contention.
The core function is to distribute incoming network traffic across multiple backend servers. This distribution prevents any single server from becoming saturated under load, which would otherwise lead to performance degradation or complete failure.
This distribution is also the mechanism for achieving high availability. If a backend server fails its health check, a properly configured load balancer will instantly and automatically remove it from the active server pool and reroute traffic to the remaining healthy instances. For your end-users, the failure is transparent. This principle is fundamental to building fault-tolerant, self-healing systems. To delve deeper into the architectural patterns, review this guide on understanding distributed systems and their topologies.
Choosing Between Layer 4 and Layer 7
Your first critical architectural decision is selecting the operational layer for load balancing. This choice dictates the sophistication of the routing logic your load balancer can execute.
-
Layer 4 (Transport Layer): This operates at the transport level (TCP/UDP). Decisions are made based on data from network packets, specifically source/destination IP addresses and ports. It's exceptionally fast due to its simplicity and doesn't need to inspect packet contents. This makes it ideal for high-throughput, non-HTTP/HTTPS workloads where raw packet-forwarding speed is paramount.
-
Layer 7 (Application Layer): This operates at the application level, providing access to protocol-specific data like HTTP headers, cookies, URL paths, and query parameters. This enables highly granular, content-aware routing decisions. For example, you can route requests for
/api/v2to a dedicated microservice pool or implement session persistence by inspecting a session cookie.
Use this decision tree to determine the appropriate layer for your workload.
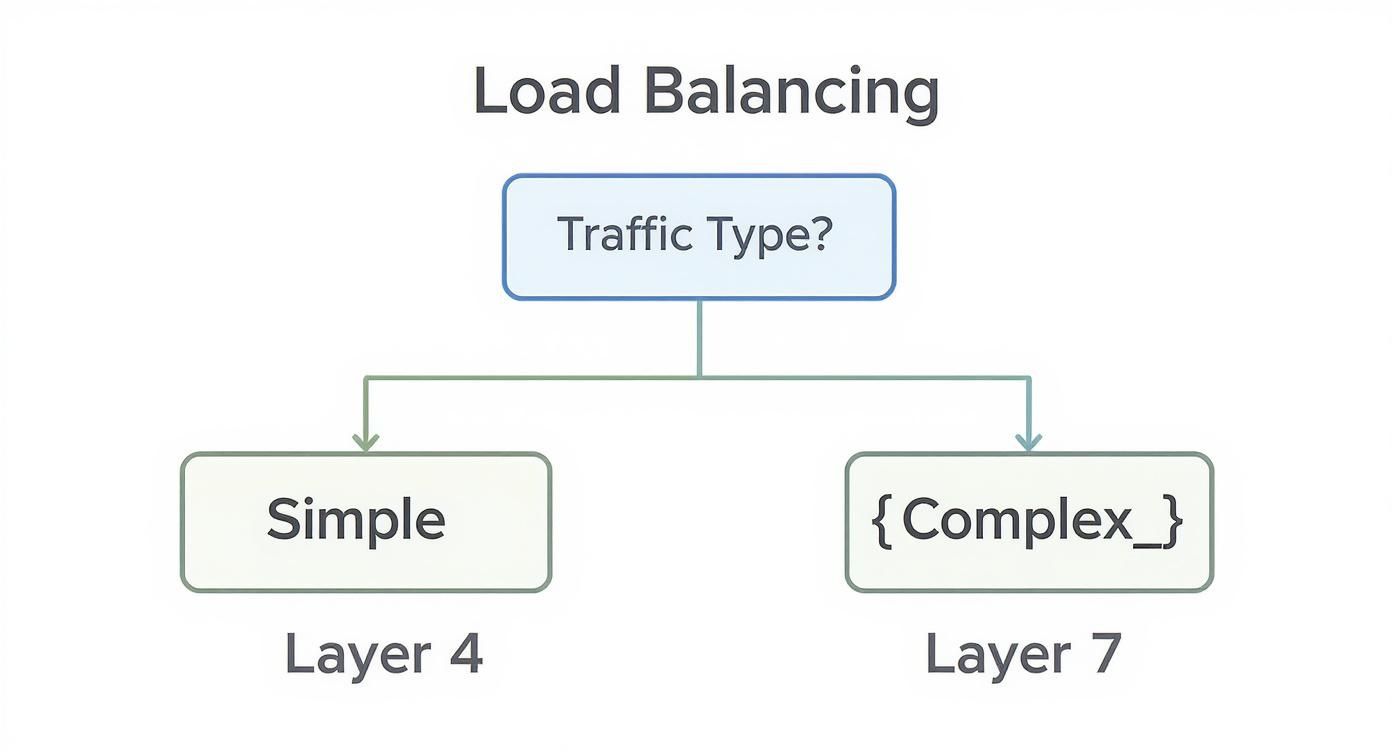
As illustrated, high-volume, simple TCP/UDP traffic is an optimal fit for Layer 4. However, any application requiring content-based routing logic necessitates the intelligence of a Layer 7 configuration.
The demand for this level of sophisticated traffic management is a primary driver behind the global load balancer market's growth, which is currently valued at approximately $6.2 billion. Before proceeding, ensure you have a firm grasp of the core concepts by understanding the fundamentals of network load balancing.
Comparing Common Load Balancing Algorithms
After selecting the layer, you must choose a distribution algorithm. This logic dictates how the load balancer selects a backend server for each new request. The algorithm has a direct impact on resource utilization and application performance.
Here is a technical analysis of the most common algorithms, their underlying mechanisms, and their optimal use cases.
| Algorithm | Technical Mechanism | Ideal Use Case |
|---|---|---|
| Round Robin | Iterates through a list of backend servers, forwarding each new request to the next server in a circular sequence. (server_index = request_count % server_count) |
Best for homogeneous server pools where all instances have identical processing capacity and handle stateless requests of similar complexity. |
| Least Connections | Maintains a real-time counter of active connections for each backend server and forwards the new request to the server with the lowest count. | Excellent for applications with varying session durations or request complexities, as it dynamically distributes load based on current server workload, preventing overload on any single instance. |
| IP Hash | Computes a hash of the source client's IP address and uses this hash to consistently map the client to a specific backend server. (server_index = hash(client_ip) % server_count) |
Essential for stateful applications that require session persistence but cannot use cookies. It ensures all requests from a single client hit the same server, maintaining session state. |
| Weighted Round Robin | An extension of Round Robin where an administrator assigns a numerical "weight" to each server. Servers with a higher weight receive a proportionally larger number of requests. | Perfect for heterogeneous environments with servers of varying capacities (CPU, RAM). It allows you to balance the load according to each server's actual processing power. |
While Round Robin is a common default, do not hesitate to switch to a more dynamic algorithm like Least Connections if monitoring reveals an imbalanced load distribution across your backend pool.
Preparing Your Backend Environment
A load balancer's reliability is entirely dependent on the health and consistency of the servers it manages. Before routing live traffic, your backend environment must be standardized, healthy, and reachable. A robust foundation here prevents intermittent and hard-to-diagnose production issues.
The core of your backend is the server pool (also known as a target group or backend set). This is a logical grouping of server instances that will service requests. The non-negotiable rule is consistency: every server in the pool must be a functional replica.
This means identical operating systems, application code, dependencies, and environment configurations. Any deviation can lead to inconsistent application behavior and elusive bugs. To enforce this uniformity, especially at scale, Infrastructure as Code (IaC) and configuration management tools like Ansible or Terraform are essential.
Solidifying Network and Security Rules
With your servers provisioned, the next technical step is configuring network connectivity. The load balancer requires a clear, low-latency network path to each backend instance. Misconfigured firewall or security group rules are a frequent source of deployment failures.
You must configure your network ACLs and firewall rules (e.g., AWS Security Groups, Azure Network Security Groups) to explicitly allow inbound traffic from the load balancer's IP address or security group on the application's listening port (e.g., port 80 for HTTP, 443 for HTTPS). Crucially, this rule should be scoped as narrowly as possible. Do not allow traffic from 0.0.0.0/0 to your backend servers.
Pro Tip: Your backend servers should never be directly accessible from the public internet. The load balancer must be the sole ingress point. This security posture, known as a bastion or jump host model for traffic, significantly reduces your application's attack surface and prevents users from bypassing your routing and security logic.
Configuring Intelligent Health Checks
A key function of a load balancer is its ability to automatically detect and eject unhealthy servers from the active rotation. This is accomplished via health checks. Without properly configured health checks, your load balancer would become a failure distributor, sending traffic to dead instances and causing widespread user-facing errors.
You must define a precise mechanism for determining server health. Common and effective approaches include:
- TCP Probes: The load balancer attempts to establish a TCP connection on a specified port. A successful three-way handshake constitutes a pass. This is a basic but reliable check to confirm that a service process is running and listening on the correct port.
- HTTP/HTTPS Checks: A more robust method where the load balancer sends an HTTP/S GET request to a dedicated health check endpoint (e.g.,
/healthzor/status). It then inspects the HTTP response code, expecting a200 OK. Any other status code (e.g.,503 Service Unavailable) is treated as a failure. This validates not just network connectivity but also the application's ability to process requests.
When configuring these checks, you must fine-tune the timing and threshold parameters to control their behavior.
| Setting | Description | Recommended Practice |
|---|---|---|
| Timeout | The maximum time in seconds to wait for a health check response before considering it a failure. | Keep this value low, typically 2-5 seconds, to enable rapid detection of unresponsive servers. |
| Interval | The time in seconds between consecutive health checks for a single instance. | A moderate interval of 10-30 seconds strikes a balance between rapid detection and avoiding excessive health check traffic. |
| Unhealthy Threshold | The number of consecutive failed checks required to mark a server as unhealthy. | Set to 2 or 3. A value of 1 can lead to false positives due to transient network issues (flapping). |
Correctly tuning these parameters creates a truly fault-tolerant system. By methodically preparing your backend servers, network rules, and health checks, you build a reliable foundation that simplifies all subsequent load balancer configuration.
Configuring Your Load Balancer Listeners and Rules
With a healthy backend pool established, you can now define the load balancer's frontend behavior. This involves configuring listeners and the associated routing rules that govern how incoming traffic is processed and directed.
A listener is a process that checks for connection requests on a specific protocol and port combination. For a standard web application, you will configure at least two listeners:
- HTTP on port 80.
- HTTPS on port 443.
When a client request arrives at the load balancer's public IP on one of these ports, the corresponding listener accepts the connection. A common best practice is to configure the HTTP listener on port 80 to issue a permanent redirect (HTTP 301) to the HTTPS listener on port 443, thereby enforcing secure connections.
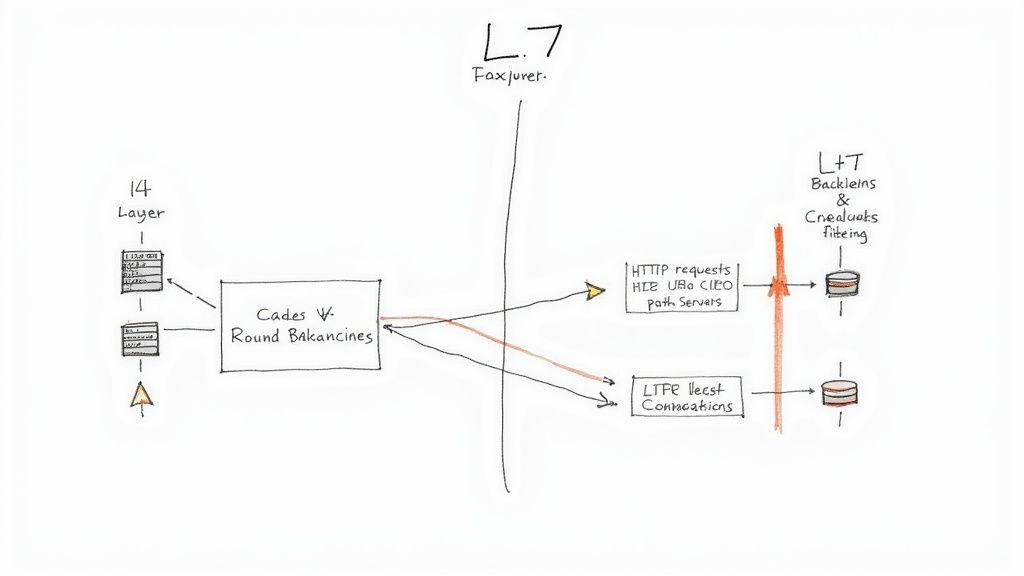
Engineering Your Routing Rules
Once a listener accepts a connection, it applies a set of ordered rules to determine the appropriate backend server pool. This is where the power of Layer 7 load balancing becomes evident, allowing for sophisticated, content-aware traffic management that goes far beyond what a simple reverse proxy can offer. A solid understanding of how to configure a reverse proxy provides a good conceptual foundation.
These rules inspect attributes of the incoming request and route it to a specific target group if the conditions are met. Common routing rule conditions include:
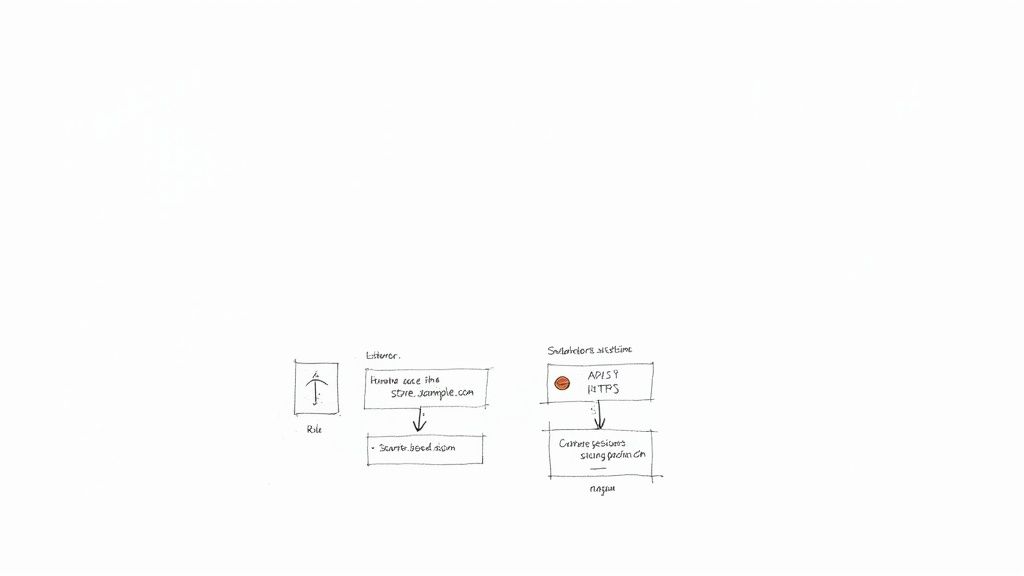
- Path-Based Routing: Route requests based on the URL path. For instance,
if (path == "/api/*") then forward to api_server_pool;whileif (path == "/images/*") then forward to static_asset_servers;. - Hostname-Based Routing: Route traffic based on the HTTP
Hostheader. For example,if (host == "store.example.com") then forward to ecommerce_backend;whileif (host == "blog.example.com") then forward to wordpress_servers;.
Rules are evaluated in a specific priority order (e.g., lowest numerical value first). It is critical to define a default rule with the lowest priority that catches all traffic not matching any specific condition, directing it to a primary server pool.
A common mistake is building an overly complex rule set from the outset. Start with a simple default rule forwarding all traffic to your main backend pool. Then, incrementally add and test more specific rules one at a time to ensure they function as expected without unintended side effects.
Implementing Session Persistence
For many stateful applications, it is critical that all requests from a single user during a session are handled by the same backend server. Routing a user to a different server mid-session can result in lost state (e.g., an empty shopping cart), creating a frustrating user experience.
This is solved with session persistence, also known as "sticky sessions."
The most prevalent implementation is cookie-based affinity. Here is the technical workflow:
- A user sends their first request. The load balancer selects a backend server using the configured algorithm (e.g., Least Connections).
- Before forwarding the response to the user, the load balancer injects its own HTTP cookie (e.g.,
AWSALB,BIGipServer) into the response headers. - The user's browser stores this cookie and automatically includes it in all subsequent requests to the same domain.
- The load balancer inspects incoming requests for this persistence cookie. If present, it bypasses the load-balancing algorithm and forwards the request directly to the server identified by the cookie's value.
This mechanism ensures a consistent user experience for stateful applications. When configuring cookie-based affinity, you define a cookie name and an expiration time (TTL) which dictates the duration of the session stickiness.
Boosting Security and Performance
A modern load balancer serves as a critical network appliance for both security enforcement and performance optimization. By offloading specific tasks from your backend servers, you can significantly improve the resilience and speed of your application. These advanced configurations elevate the load balancer from a simple traffic distributor to the intelligent, high-performance core of your infrastructure.
One of the most impactful configurations is SSL/TLS termination (or SSL offloading). Instead of each backend server bearing the CPU-intensive overhead of TLS handshake negotiations, encryption, and decryption, this entire workload is centralized on the load balancer.
The workflow is as follows: The load balancer handles the secure TLS connection with the client, decrypts the incoming HTTPS traffic, and then forwards the now-unencrypted HTTP request to the backend servers over your secure, private network. This offloading frees up significant CPU resources on your application servers, allowing them to focus exclusively on executing application logic. For a comprehensive look at backend efficiency, review these strategies for application performance optimization.
Hardening Your Defenses with ACLs and a WAF
With TLS termination enabled, the load balancer has full visibility into the decrypted Layer 7 traffic, which allows for the application of advanced security policies.
Your primary defense mechanism should be Access Control Lists (ACLs). These are firewall rules that filter traffic based on source IP addresses. For example, you can implement a "deny" rule for known malicious IP address ranges or an "allow" rule for an internal application that only permits traffic from your corporate VPN's IP CIDR block. This is a highly effective method for blocking unauthorized access attempts at the network edge.
A critical best practice is to integrate a Web Application Firewall (WAF) with your load balancer. A WAF inspects the content of HTTP requests for common attack vectors like SQL injection (SQLi) and cross-site scripting (XSS) based on a set of rules (e.g., the OWASP Top 10). Most cloud-native and hardware load balancers offer WAF integration as a native feature.
Optimizing Content Delivery for Speed
Beyond security, your load balancer can be configured to dramatically improve client-side performance.
Enabling HTTP/2 on your HTTPS listener is a significant performance gain. HTTP/2 introduces multiplexing, allowing multiple requests and responses to be sent concurrently over a single TCP connection, which drastically reduces latency caused by head-of-line blocking present in HTTP/1.1.
Additionally, enabling Gzip compression is essential. The load balancer can compress text-based assets (HTML, CSS, JavaScript) on-the-fly before sending them to the client's browser. The browser then decompresses the content. This can reduce payload sizes by up to 70%, resulting in substantially faster page load times and reduced bandwidth costs.
These advanced features are becoming standard. The hardware load balancer market, valued at around $3.9 billion, is rapidly evolving to incorporate AI and machine learning for predictive traffic analysis and automated security threat mitigation. You can explore market research on hardware load balancers to understand how these intelligent systems are shaping the industry.
Validating and Stress-Testing Your Configuration
https://www.youtube.com/embed/hOG8PaYvdIA
A load balancer configuration is purely theoretical until it has been validated under realistic conditions. Deploying an untested configuration into production is a direct cause of outages. A methodical validation and stress-testing protocol is mandatory to ensure a configuration is not just syntactically correct, but operationally resilient.
The initial step is functional validation: confirm that the load balancer is distributing traffic according to the configured algorithm. A simple curl command within a loop is an effective tool for this. By inspecting a unique identifier in the response from each backend server, you can verify the distribution pattern.
# A simple loop to check traffic distribution
# Assumes each backend server returns a unique identifier, e.g., its hostname or container ID
for i in {1..10}; do
  curl -s http://your-load-balancer-address/ | grep "Server-ID";
  sleep 1;
done
If you configured a Round Robin algorithm, the Server-ID in the output should cycle sequentially through your backend instances. This provides immediate confirmation of listener rule processing and backend pool health.
Simulating Real-World Failure Scenarios
Once you've confirmed basic traffic flow, you must validate the failover mechanism through chaos engineering. A server failure is an inevitability; your system must handle it gracefully. The only way to verify this is to induce a failure yourself.
Intentionally stop the application process or shut down one of your backend server instances.
Immediately re-run your curl loop. The output should now show traffic being routed exclusively to the remaining healthy instances, with the failed server completely absent from the rotation. This test is non-negotiable; it proves that your health check configuration (interval, timeout, and thresholds) is effective at detecting failure and that the load balancer correctly removes the failed node from the pool.
This deliberate failure injection is critical. It validates that your configured thresholds are tuned correctly to remove a failed server from rotation quickly, thus minimizing the window of potential user impact.
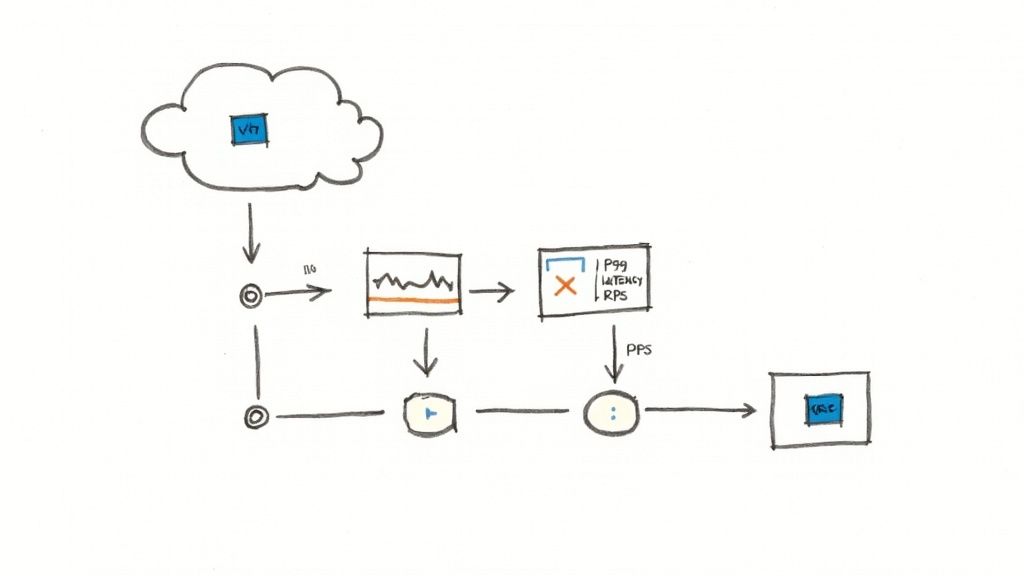
Performance and Load Testing Under Pressure
With functional and failover capabilities verified, the final step is performance validation. You must understand the breaking point of your system under heavy load. Load testing tools like Apache JMeter or k6 are designed for this purpose, allowing you to simulate thousands of concurrent users.
During these tests, monitor key performance indicators (KPIs) to identify bottlenecks. Focus on these critical metrics:
- P99 Latency: The response time for the 99th percentile of requests. A sharp increase in this metric indicates that your backend servers are approaching saturation.
- Requests Per Second (RPS): The maximum throughput your system can sustain before performance degrades or error rates increase. This defines your system's capacity.
- Backend Error Rate: An increase in
5xxHTTP status codes (e.g., 502, 503, 504) from your backend servers is a definitive signal that they are overloaded and unable to process incoming requests.
This data-driven testing methodology is what transitions your configuration from "functionally correct" to "production-ready." The economic reliance on highly available systems is driving the load balancer market's projected growth from $5.51 billion to $18.54 billion. This expansion is led by industries like fintech and e-commerce where downtime is unacceptable—a standard achievable only through rigorous, empirical testing. You can learn more about the driving forces behind the load balancer market to appreciate the criticality of these engineering practices.
Load Balancer Configuration FAQs
Even with meticulous planning, you will encounter technical challenges and questions during configuration. This section provides direct, technical answers to common issues to help you troubleshoot and optimize your setup.
Can I Balance Non-HTTP Traffic?
Yes. While web traffic (HTTP/S) is the most common use case, Layer 4 load balancers are designed to be protocol-agnostic. They operate at the transport layer (TCP/UDP) and are concerned only with IP addresses and port numbers, not the application-layer payload.
This makes them suitable for a wide range of services:
- Database Connections: Distributing read queries across a cluster of PostgreSQL or MySQL read replicas.
- Gaming Servers: Handling high volumes of TCP and UDP packets for real-time multiplayer game sessions.
- MQTT Brokers: Building a highly available and scalable backend for IoT device messaging.
- Custom TCP Services: Any proprietary TCP-based application can be made highly available.
The configuration simply requires creating a TCP or UDP listener on the load balancer instead of an HTTP/S listener, pointing it to your backend pool on the correct port.
Key Takeaway: For any TCP/UDP-based service where application-level inspection is unnecessary and maximum throughput is the priority, a Layer 4 load balancer is the correct and most efficient tool.
How Do I Handle Server Weight Differences?
In real-world environments, server fleets are often heterogeneous, comprising a mix of instances with varying CPU and memory capacities. A simple Round Robin algorithm would overload less powerful servers.
To solve this, use a Weighted Round Robin or Weighted Least Connections algorithm. These algorithms allow you to assign a numerical "weight" to each server in the backend pool during configuration.
The load balancer distributes traffic proportionally to these weights. For example, a server with a weight of 200 will receive twice as many new connections as a server with a weight of 100. This allows you to precisely balance the load based on each machine's actual capacity, ensuring optimal resource utilization across your entire infrastructure.
What Is the Difference Between a Load Balancer and a Reverse Proxy?
While they appear functionally similar as intermediaries between clients and servers, their core purpose, feature set, and intended use case are distinct.
A reverse proxy's primary functions are often forwarding, caching, SSL termination, and serving as a single gateway. A dedicated load balancer is engineered specifically for traffic distribution, high availability, and scalability.
Here is a technical comparison:
| Feature | Reverse Proxy (e.g., Nginx, HAProxy) | Load Balancer (e.g., AWS ALB, F5 BIG-IP) |
|---|---|---|
| Primary Goal | Request forwarding, URL rewriting, caching, and serving as a single ingress point. | Distributing traffic across a pool of servers to ensure high availability and scalability. |
| Health Checks | Often provides basic active or passive health checks. | Core feature with advanced, configurable active health checks (TCP, HTTP/S, custom) and automated failover. |
| Scalability | Can become a single point of failure unless explicitly deployed in a complex high-availability cluster. | Natively designed for high availability and dynamic scalability, often as a managed cloud service. |
In summary, while a reverse proxy can perform rudimentary load balancing, a true load balancer is a purpose-built, feature-rich appliance designed for the rigorous demands of managing production traffic at scale.
Navigating the complexities of load balancing and infrastructure automation requires deep expertise. OpsMoon provides access to the top 0.7% of DevOps engineers who can design and implement a resilient, scalable, and secure architecture for your application. Start with a free work planning session to map out your infrastructure roadmap. Learn more at https://opsmoon.com.
Leave a Reply